
Which 3D printer nozzle size to use: 0.2, 0.4, 0.6 or 0.8 mm

Nozzle diameter sets the width of the plastic line, and that line decides how much detail fits on the part, which layer heights are possible and how likely a clog is. The good news is that the choice is free to test: the slicer shows the time, the grams and the line path before you spend money on a new nozzle.
Which nozzle to choose
| Nozzle | Choose it when | Layer height | Watch out for |
|---|---|---|---|
| 0.2 mm | A miniature or lettering that does not fit a 0.4, even with Arachne | 0.05 to 0.12 mm | Much slower, clogs even from dust, and is not for filament with particles or fiber |
| 0.4 mm | Almost everything: it is the printers' default | 0.1 to 0.3 mm | With fiber, it must be hardened steel |
| 0.6 mm | Functional parts, thicker lines, fiber-filled filament | 0.15 to 0.45 mm | Loses detail, bridges get worse, and it may use more material, depending on the profile |
| 0.8 mm | Large, thick parts, vase mode | 0.2 to 0.6 mm | Low precision, supports are hard to remove, and small lettering can disappear |
The ranges and cautions come from Bambu Lab's nozzle page, checked in November 2026. Prusa adds that a larger nozzle may increase warping. The layer height rule is covered in detail in the layer height guide.
What fits in each line
We sliced the same small plate with all four nozzles, with the word "Maker" in relief: 25 mm wide with strokes of about 0.8 mm. The image draws the last layer from the G-code, at the real width of each line. The gray shape is what should have been there.
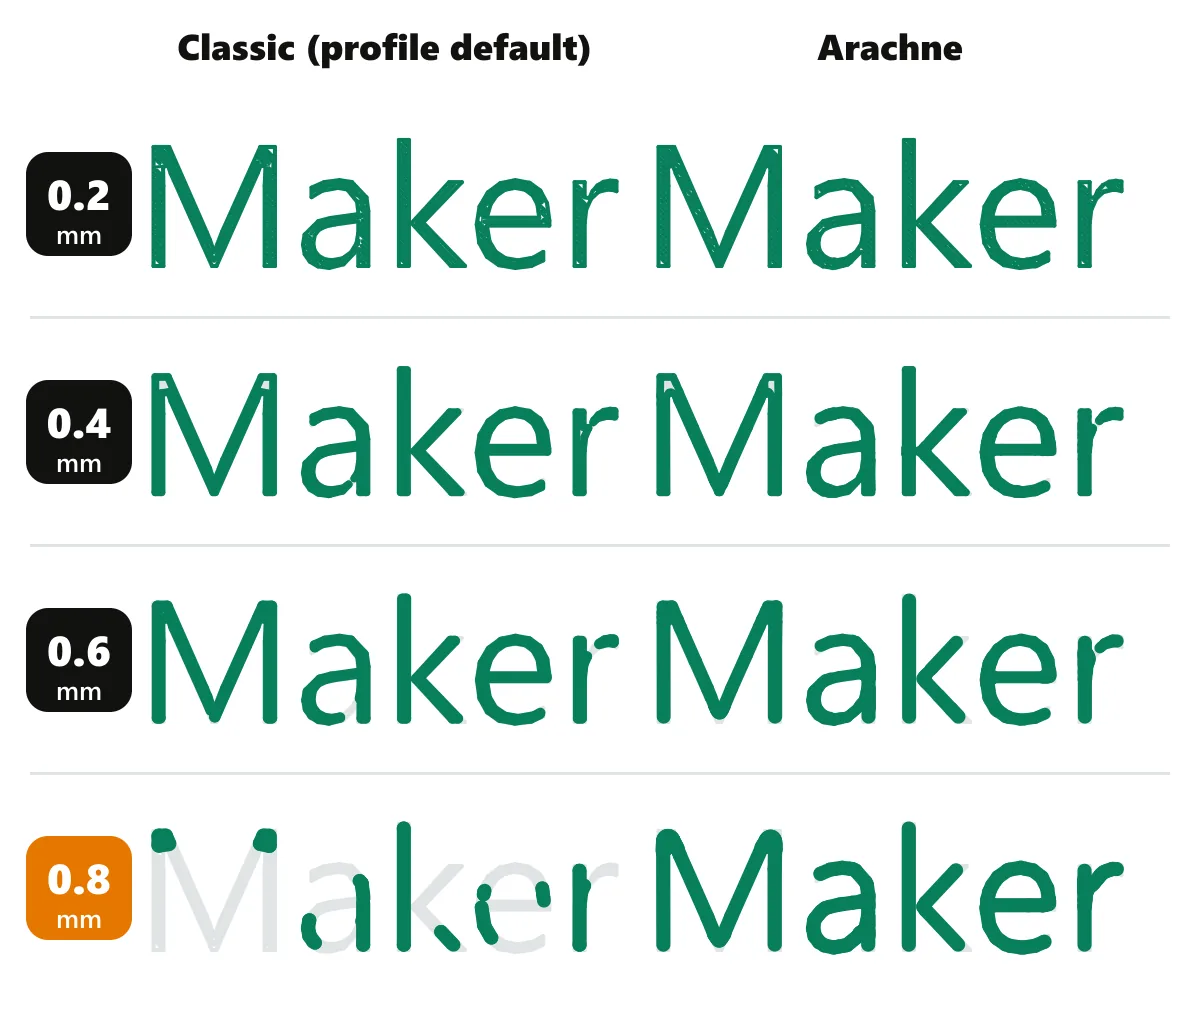
The default profile uses the Classic generator, with fixed-width lines. When a stroke is thinner than the line, Classic simply skips that piece, which is what happened on the 0.8. The Arachne generator varies the line width to fit the space, and the path of the word reappeared.
Arachne recovers the path in preview, but a 0.8 nozzle still has physical limits for reproducing small details, and this part was not printed. If the lettering is the product, as on a name keychain, the rough top surface guide shows what to test before moving to a fine nozzle.
The test that decides, at no cost: in Bambu Studio, switch the printer to the version with the nozzle you plan to buy, slice your part and open the preview in Line Type. If the stroke breaks up, change Quality > Wall generator to Arachne and slice again. If it still fails, that nozzle may not reproduce the detail with those settings: consider a smaller nozzle or adjust the model.
Does a bigger nozzle print faster?
Not always. We sliced the same parts in Bambu Studio for an A1, with each nozzle's Standard profile: 0.10 mm layers on the 0.2, 0.20 on the 0.4, 0.30 on the 0.6 and 0.40 on the 0.8. The 0.2 profile uses 4 walls; the others use 2. All with 15% infill.
| Part | Filament | 0.2 mm | 0.4 mm | 0.6 mm | 0.8 mm |
|---|---|---|---|---|---|
| Plate 200 × 100 × 4 mm | Generic PLA | 412 min, 44 g | 73 min, 51 g | 75 min, 56 g | 82 min, 71 g |
| Plate 200 × 100 × 4 mm | Bambu PLA Basic | 349 min, 44 g | 58 min, 52 g | 58 min, 57 g | 54 min, 72 g |
| Box 80 × 60 × 40 mm | Generic PLA | 463 min, 51 g | 74 min, 53 g | 74 min, 59 g | 78 min, 65 g |
| Cup Ø 90 × 120 mm, 2 mm wall | Generic PLA | 786 min, 82 g | 117 min, 91 g | 113 min, 92 g | 115 min, 91 g |
| Cup Ø 90 × 120 mm, 2 mm wall | Bambu PLA Basic | 653 min, 84 g | 90 min, 93 g | 87 min, 94 g | 80 min, 93 g |
These are slicer estimates; none of these parts was printed. They apply to these profiles and these parts.
With generic PLA, the 0.8 was slower than the 0.4 on the plate and the box, and practically tied on the cup. With Bambu PLA Basic it was 7% to 11% faster, but on the plate it used 38% more plastic. The fine nozzle is another story: on the default profile it was 6 to 7 times slower than the 0.4. Part of that comes from the profile: with the layer height matched at 0.10 mm and the walls at 4, the gap fell to about 4 times, and other profile limits may still play a part.
The reason is volumetric flow, the volume of plastic extruded per second, in mm³/s; how much the hotend can melt is one of its limits. The generic PLA profile caps it at 12 mm³/s, and the Bambu PLA Basic profile at 21 mm³/s. A bigger nozzle lays down thicker lines, but if the flow is already at its limit, it just moves more slowly to compensate. To confirm it, we changed one thing at a time on the plate with generic PLA and the 0.8 nozzle:
| Change, in simulation only | Time | Filament |
|---|---|---|
| Default 0.8 profile | 82 min | 71 g |
| Same speeds as the 0.4 profile | 82 min | 71 g |
| 0.20 mm layers instead of 0.40 | 71 min | 60 g |
| Flow limit raised from 12 to 40 mm³/s | 40 min | 71 g |
Raising the speed changed nothing. Raising the flow limit cut the time in half, which shows where the bottleneck was. Do not copy that 40: it was a value to isolate the cause in the simulation, and your hotend and filament may not melt that much. The real value for your setup comes from the maximum volumetric speed test, which is not the same as flow calibration.
How much this changes the part's cost
With the calculator's reference values (PLA at $20/kg and a machine hour of $0.17):
| Example | Nozzle | Time | Filament | Cost |
|---|---|---|---|---|
| Plate, generic PLA | 0.4 mm | 72.8 min | 51.0 g | $1.23 |
| Plate, generic PLA | 0.8 mm | 82.3 min | 70.6 g | $1.64 |
| Cup, Bambu PLA Basic | 0.4 mm | 89.7 min | 92.7 g | $2.11 |
| Cup, Bambu PLA Basic | 0.8 mm | 79.7 min | 92.9 g | $2.08 |
On the plate, the bigger nozzle made the part $0.41 more expensive. On the cup, which is mostly walls, it saved 10 minutes and tied on cost. If you sell, take the time and grams of the nozzle you plan to use to the calculator, because the price moves with them. The cost per hour guide explains where the $0.17 comes from.
Filament with fiber or particles
Nozzle size and material have to match the filament. This is a summary of Bambu Lab's filament guide, for the brand's materials:
| Filament | 0.2 nozzle | Best choice | Hardened steel |
|---|---|---|---|
| Regular PLA, PETG, ABS and ASA | Compatible | 0.4 mm | Not needed |
| Bambu PLA-CF and PETG-CF | Do not use | 0.4 mm | Required |
| PLA Glow | Do not use | 0.4 mm | Required |
| PA-CF, PAHT-CF and PET-CF | Do not use | 0.6 mm | Required |
| PLA Wood and PLA Marble | Do not use | 0.4 mm or larger | Check the spool's data sheet |
Bambu Lab explains that fiber particles are usually larger than the 0.2 opening and clog it quickly. For fiber from other brands, its first choice is a hardened 0.6, with less risk of clogging, and its second is a hardened 0.4. For wood and marble, the brand's own pages differ on hardened steel: follow the spool's data sheet.
Brass, common on other brands, is not recommended by Prusa for abrasives, because it wears quickly. Not every decorative particle wears a nozzle the same way, but if the data sheet says abrasive, do not risk it.
After swapping the nozzle
- Pick the new nozzle's profile in the slicer. With the wrong profile, the line width and flow are wrong.
- Tell it which nozzle is installed. In the slicer it comes with the printer you select; also check the printer's panel, if it has that setting.
- Redo whatever calibration your printer asks for, and leave bed measuring on for the first print, as the first layer guide explains.
- Open the preview and check thin walls before you print.
With a 0.2 nozzle, the cleaning needle does not fit through the hole, according to Bambu Lab's page on the 0.2. Keep the spool away from dust, because a single speck can clog it.
Frequently asked questions
Does a 0.2 nozzle clog more?
Yes. Bambu Lab mentions a high clog risk and says small specks of dust are enough. Use clean filament with no particles, and keep the spool away from dust.
Does a 0.6 nozzle make parts stronger?
It can help, because the lines are thicker and Bambu Lab cites better layer bonding. But strength also depends on the part's orientation, the number of walls, the material and the temperature. We did not measure strength in this guide.
Is a 0.8 nozzle worth it?
It depends on the part and your filament's flow. On a large part with a high-flow filament, it can save time. With limited flow, it may use more plastic without reducing the time. Slice your part with both before you buy.
Do I need a hardened steel nozzle for regular PLA?
No. Hardened steel is for abrasive filament, such as carbon fiber, glass fiber and glow-in-the-dark. For regular PLA, PETG, ABS and TPU, the nozzle that came with the printer is fine.
Can I print with a 0.6 nozzle using the 0.4 profile?
That is not the right way. The profile sets the line width and flow for that diameter. Select the printer with the installed nozzle in the slicer, and the layer and line options change with it.