
0.12 vs 0.20 layer height: print time, quality and strength

Layer height is the thickness of each slice the printer lays down. It is the setting that moves print time the most, and the one that shows the least on many parts.
What layer height changes on the part
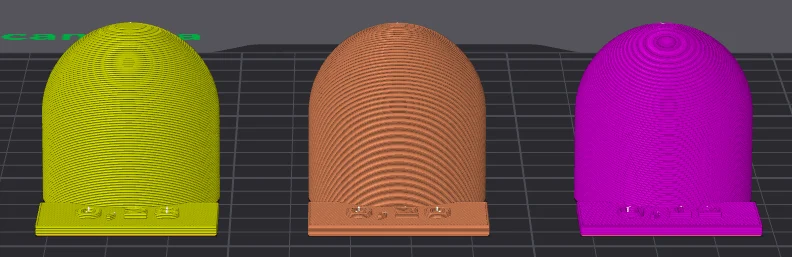
It only sets the vertical resolution. A straight wall looks almost the same at 0.12 or 0.20 mm, because every layer has the same outline. The difference shows on slopes and curves: each layer becomes a step, and the flatter the surface, the wider the step.
Step width follows a simple formula: step ≈ layer height ÷ tangent of the slope. On a surface 10° from horizontal, like the top of a dome, 0.28 mm gives 1.59 mm steps and 0.12 mm gives 0.68 mm steps. At 45°, the step is as wide as the layer is tall.
The time math: 0.08 to 0.28 mm
The number of layers is the part's height divided by the layer height. On a 60 mm part: 60 ÷ 0.20 = 300 layers; 60 ÷ 0.12 = 500, or 1.67×; 60 ÷ 0.08 = 750, or 2.5×. Time follows, but not all the way:
| Layer height | Bambu Lab profile | Layers (60 mm) | Estimated time | Time vs 0.20 | Inverse math |
|---|---|---|---|---|---|
| 0.28 mm | Extra Draft | 214 | 43 min | 0.80× | 0.71× |
| 0.24 mm | Draft | 250 | 48 min | 0.90× | 0.83× |
| 0.20 mm | Standard | 300 | 54 min | 1.00× | 1.00× |
| 0.16 mm | Optimal | 375 | 65 min | 1.20× | 1.25× |
| 0.12 mm | Fine | 500 | 1 h 22 min | 1.51× | 1.67× |
| 0.08 mm | Extra Fine | 750 | 2 h 01 min | 2.25× | 2.50× |
Illustrative example: a dome 60 mm wide and 60 mm tall (a 30 mm cylinder with a half sphere on top), 15% infill, using each height's Bambu Lab X1 Carbon profile (0.4 mm nozzle) and PLA Basic. Times estimated by OrcaSlicer 2.4.2; they are not measurements. Layer counts use height ÷ layer height; the first layer is 0.2 mm in all of these profiles.
Filament stayed between 39 and 40 g on every row: the part has the same volume, just sliced differently.
Time doesn't follow the inverse math exactly because much of the print runs into the nozzle's flow limit: the PLA Basic profile caps melting at 21 mm³/s. A 0.45 mm wide line at 0.28 mm tall and 200 mm/s would need 25 mm³/s, so the printer slows down; with thin layers, it can move faster. When flow is the limit, time depends on the volume of plastic, which is the same at any layer height. That is why the result lands between the two: 0.12 mm took 1.51×, not 1.67×, and 0.28 mm saved 20%, not 29%.
In money, the 28 extra minutes at 0.12 mm cost about $0.08 per part, using the calculator's default machine and electricity rate of about $0.17 an hour. On a batch of 10 parts, that is 4 h 40 min more printer time. The hourly math is in the guide to cost per hour.
The nozzle rule
The rule of thumb is to keep layers between 25% and 75% of the nozzle diameter. Bambu Lab's profiles sit slightly lower, between 20% and 70%, and Prusa (checked November 2026) puts the ceiling at 80%: above that, layer adhesion gets much worse.
| Nozzle | 25% to 75% rule | Bambu Lab profile limits |
|---|---|---|
| 0.2 mm | 0.05 to 0.15 mm | 0.04 to 0.14 mm |
| 0.4 mm | 0.10 to 0.30 mm | 0.08 to 0.28 mm |
| 0.6 mm | 0.15 to 0.45 mm | 0.12 to 0.42 mm |
| 0.8 mm | 0.20 to 0.60 mm | 0.16 to 0.56 mm |
Quality and strength
For looks, fine layers pay off where there are gentle curves: miniatures, faces, domes, rounded tops. On a flat top they don't help; there, ironing is what smooths the surface.
For strength, within the nozzle's range, layer height matters little next to walls, temperature and part orientation. Two caveats: near the 80% ceiling adhesion drops, and with thin layers the slicer needs more top layers for the same thickness. Bambu's 0.08 mm profile already uses 9 top layers, against 5 at 0.20 mm. For a stronger part, start with walls, as the guide to infill percentage shows.
When 0.12 mm is a waste of time
- Parts with straight walls: boxes, brackets, organizers, technical parts.
- Parts you will sand and paint: sanding and primer usually cover small steps.
- Large parts seen from a distance and fit tests.
- Flat tops: thin layers don't smooth a flat top.
When only part of the model is curved, use variable layer height: the slicer thins the layers only where there is a curve and keeps the rest thick, so the time lands between the two.
Where it is in the slicer
- Bambu Studio and OrcaSlicer: Quality tab > Layer height, or pick the profile directly (0.12mm Fine, 0.20mm Standard...). Variable height is the Variable layer height tool in the top toolbar, with the Adaptive button, as shown in the Bambu Lab wiki (checked November 2026). For a specific height range, use Height range Modifier in the right-click menu.
- PrusaSlicer: Print Settings > Layers and perimeters > Layer height; variable height is the Variable layer height tool.
- Cura: Quality section, Layer Height; the automatic version is Use Adaptive Layers, under Experimental.
Frequently asked questions
Do thinner layers use more filament?
Practically no. The part's volume is the same. In the example, every height came out between 39 and 40 g; the small differences come from details such as each profile's number of top layers.
Is it worth printing everything at 0.28 mm to save time?
For drafts, large parts or fit tests, yes. Bambu Lab itself describes the Extra Draft profile as having more visible layer lines and lower quality in exchange for time. Just don't expect the savings from the inverse math: in the example it was 20%, not 29%.
Should the first layer be the same height as the rest?
It doesn't have to be. Bambu's profiles keep the first layer at 0.2 mm at every height, because a thicker first layer forgives small bed irregularities. Adhesion problems are covered in the guide to first layer not sticking.
Does variable layer height work with multiple colors?
Yes, with one condition in Bambu Studio: the prime tower can only be used if every object on the plate has the same variable layer height settings. Variable layer height also doesn't work with organic tree supports.